In the year 2 BBY, Phoenix Cell launched a mission to rescue Agent Kallus from the Galactic Empire after learning that Grand Admiral Thrawn was close to uncovering his alternate identity as the rebel informant Fulcrum. As part of the mission, Ezra Bridger along with the droids AP-5 and Chopper stole a shuttle and allowed it to be captured by Lieutenant Yogar Lyste's Arquitens-class command cruiser. After Thrawn summoned Lieutenant Lyste and Agent Kallus for an audience aboard his Imperial Star Destroyer Chimaera, Kallus and the rebels worked together to prevent Thrawn from discovering the location of Chopper Base. In an effort to prevent Thrawn from discovering that he was Fulcrum, Kallus framed Lieutenant Lyste. After the rebels escaped, Thrawn and Colonel Wullf Yularen deduced that Kallus was indeed Fulcrum but kept this information secret in order to manipulate Kallus into helping them find the rebel base.
Prelude[]

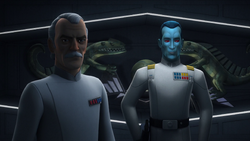
Grand Admiral Thrawn enlists Colonel Yularen's help
After encountering the Lasat rebel Garazeb Orrelios on Bahryn, the Imperial Security Bureau (ISB) Agent Kallus became a rebel sympathizer.[3] Adopting the codename Fulcrum, Kallus aided the Phoenix Cell by leaking information about Imperial cadets seeking to defect from the Skystrike Academy.[4] Later, Kallus helped the rebels Ezra Bridger, Kanan Jarrus, and Chopper escape the Imperial Armory Complex with Grand Admiral Thrawn's TIE Defender initiative. As a result of these losses, Thrawn came to suspect that the rebellion had a mole within the Lothal Sector's Command staff.[5]
Later, Kallus leaked intelligence about Thrawn's E-XD-series infiltrator droids to the rebels Zeb, Chopper, and AP-5, which led to the destruction of an Imperial Star Destroyer. Despite this setback, Thrawn managed to narrow down the search for the rebel base on Atollon to 94 worlds.[6] Later, He and Pryce intercepted one of Kallus's Fulcrum transmissions and realized that Fulcrum is the mole the growing rebellion had in the Sector's Command staff and monitored Fulcrum's next transmission to learn his true identity. Because only a highly-ranked Imperialist could have access to the classified information Fulcrum sent to the Rebel Network in said transmission, Thrawn and Pryce realized that Fulcrum was not only a spy for the growing rebellion but also a traitor to the Empire as well and enlisted Colonel Wullf Yularen's help in screening the Lothal Sector's Command staff in order to ferret out Fulcrum. The Spectres, who were monitoring Thrawn's activities, discovered that he was close to uncovering Fulcrum's true identity.[1]
As a result, Ezra along with Chopper and AP-5 embarked on a mission to rescue Kallus. Their plan involved stealing a shuttle and allowing themselves to be captured by Kallus's Arquitens-class command cruiser, which was commanded by Lieutenant Yogar Lyste. The next stage of the plan involved Kanan and Captain Rex flying a Sentinel-class landing craft to the Imperial light cruiser and pick them up.[1]
The mission[]

Ezra allows himself to be captured
Behind Imperial lines[]
The rebels' shuttle heist proceeded as planned and Ezra was captured by Yogar Lyste's stormtroopers aboard his light cruiser. AP-5 and Chopper managed to evade capture by claiming they were Imperial droids who had been unwilling passengers aboard Ezra's shuttle. While in a cell, Ezra revealed his mission to Kallus. Before they could escape the light cruiser, Lieutenant Lyste informed Agent Kallus that they had been summoned aboard Grand Admiral Thrawn's Imperial Star Destroyer Chimaera for a meeting. Seeking to regain the Empire's favor after an embarrassing incident involving the theft of three ships delivered to Lothal from Alderaan by Princess Leia on his watch, Lyste gave orders that Ezra, whom he mistakenly believed was a bounty hunter, be brought as a trophy aboard the Chimaera.[1]
AP-5 and Chopper managed to convince Lieutenant Lyste to allow them aboard by claiming to have testimony against the bounty hunter. After boarding the Chimaera, Ezra was locked in a cell in Detention Block B7. While AP-5 and Chopper sent a transmission to Kanan and Rex warning them of their change in plans, Kallus and Lyste met with Thrawn and Colonel Yularen in Thrawn's Office, who informed them of their investigation into Fulcrum who they reveal is not only a spy supplying the Phoenix Squadron informant but also a traitor in the Imperial ranks. As part of the investigation, Yularen questioned several of the Sector Command staff. Kallus also learned that Thrawn was close to locating the rebel base on the planet Atollon.[1]
Following the meeting, Kallus embarked on a plan to mislead Thrawn into believing that Lieutenant Lyste was Fulcrum. He convinced the naive and inexperienced Imperial officer that Governor Arihnda Pryce was suspected of colluding with the rebels. While talking with Lyste, Kallus switched their code cylinders. He then instructed Lyste to spy on Governor Pryce. Putting his plan into action, Kallus then freed Ezra from his cell and reunited with Chopper and AP-5, who needed a new set of clearance codes for Kanan and Rex to land on the Chimaera. Kallus and AP-5 convinced Ezra to help them infiltrate Thrawn's Office in order to delete Atollon's location and to obtain the necessary clearance codes.[1]
Deflection and escape[]

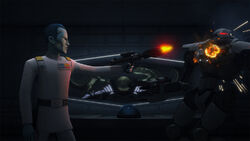
Thrawn fighting rogue sentry droids
Putting their plans into action, Kallus and his Rebel allies obtained an Imperial officer's uniform for Ezra. Ezra then used a Jedi mind trick to convince the stormtrooper sentry guarding Thrawn's Office that he was Lieutenant Lyste so that he could gain access to the room. Meanwhile, Thrawn along with Governor Pryce and Colonel Yularen visited Ezra's cell only to discover that the prisoner had escaped. Yularen also found Lyste's code cylinder was the last one used to open the cell, leading the Imperials to believing that Lyste was the traitor. Back in Thrawn's office, Kallus deleted Atollon's location from Thrawn's star chart while Chopper obtained the clearance codes.[1]
Thrawn returned to his office before the rebels and Kallus could escape. In order to create a distraction, Kallus set the Grand Admiral's DT-series sentry droids to assassinate Thrawn. While Thrawn and his stormtroopers grappled with the rogue sentry droids, the rebels and Kallus made their escape. Thrawn managed to defeat the sentry droids by blasting them and caught a glimpse of Ezra fleeing the room, mistaking him for Lieutenant Lyste. Believing Lyste was indeed Fulcrum, Thrawn contacted Yularen and instructed him and Governor Pryce to head towards the hangar.[1]
By that stage, Rex and Kanan, who were disguised as stormtroopers, had managed to land their shuttle aboard the Chimaera. Realizing that the two visiting stormtroopers were rebel infiltrators, Governor Pryce tried to arrest them but Kanan and Rex fought back. Kallus and his rebel allies managed to reach the hangar where they were joined by an unwary Lieutenant Lyste. Lyste stunned Governor Pryce and tried to help the stormtroopers only to discover they were rebel infiltrators. Kallus then tackled Lyste to the ground while the rebels fled aboard the shuttle. At the last minute, Kallus decided not to flee because they had now framed Lyste and believed that he could help the rebellion as an Imperial insider.[1]
Aftermath[]

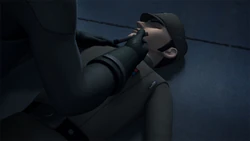
Kallus framing Lyste
When Colonel Yularen arrived, Kallus claimed that Lyste was the rebel spy. Despite Lyste's protests, he was led away. In public, Thrawn and Yularen accepted Kallus's explanation that Lyste was Fulcrum. Governor Pryce also needed little encouragement since she had been stunned by an unwary Lyste. After Kallus and Pryce had departed, Grand Admiral Thrawn and Colonel Yularen discussed their investigation into Lyste. Both men concluded that Lyste was innocent and that Kallus had framed him in order to cover up the fact that he was Fulcrum. Despite this development, Thrawn decided not to take action against Kallus in order to manipulate him into helping reveal the rebel base's location to the Empire.[1]
Behind the scenes[]
The rescue of Alexsandr Kallus serves as the plot for the Star Wars Rebels Season Three episode "Through Imperial Eyes," which premiered on February 26, 2017.
Appearances[]
 Star Wars Rebels — "Through Imperial Eyes" (First appearance)
Sources[]
 Star Wars Rebels Season 3 – Mid-Season Trailer (Official) on the official Star Wars YouTube channel (backup link) (Posted on StarWars.com)
 Rebels Recon #3.16: Inside "Legacy of Mandalore" | Star Wars Rebels on the official Star Wars YouTube channel (backup link) (Posted on StarWars.com)
 Fulcrum Trap: Through Imperial Eyes Preview | Star Wars Rebels on the official Star Wars YouTube channel (backup link) (Posted on StarWars.com)
- Star Wars: Timelines
Notes and references[]
- ↑ 1.00 1.01 1.02 1.03 1.04 1.05 1.06 1.07 1.08 1.09 1.10 1.11 1.12 1.13 1.14 1.15 1.16 1.17 1.18 1.19 1.20 1.21 1.22 1.23 1.24 1.25 1.26 1.27 1.28 1.29 1.30 1.31 1.32 1.33 1.34 1.35 1.36 1.37 1.38 1.39 1.40 1.41 1.42 1.43
 Star Wars Rebels — "Through Imperial Eyes"
- ↑ Star Wars: Timelines
- ↑
 Star Wars Rebels — "The Honorable Ones"
- ↑
 Star Wars Rebels — "The Antilles Extraction"
- ↑
 Star Wars Rebels — "An Inside Man"
- ↑
 Star Wars Rebels — "Warhead"
