| | |
- "Romodi is a general in the Imperial Army, attached to the Death Star's command staff and highly favored by Palpatine."
- ―Airen Cracken, to Mon Mothma
Hurst Romodi was a human male who served in the Grand Army of the Galactic Republic during the Clone Wars and later became one of the first generals in the Galactic Empire's Army. As an Imperial officer, Romodi was involved in the pacification of the galaxy's Western Reaches, and took reconstruction measures in the aftermath of the Battle of Ogoth Tiir. Although Romodi eventually stepped back from service, Grand Moff Wilhuff Tarkin coaxed him out of retirement to participate in the completion of the Death Star project. After witnessing the first live test fire of the Death Star's superlaser on the Holy City of Jedha, Romodi served as General of Battle Station Operations and adjutant to Tarkin around the time of the Battle of Scarif.
Biography[]
Early life and career[]
- "Well said, cadet. Which brings us to the leadership shown by General Romodi in the aftermath of Ogoth Tiir. Turn to node thirty-six and let's discuss his reconstruction initiatives."
- ―Colonel Julyan
Hailing from Virujansi,[1] Hurst Romodi fought in the Clone Wars, a three-year pan-galactic conflict that pitted the Galactic Republic against the Confederacy of Independent Systems. When Sheev Palpatine replaced the Republic with a Galactic Empire of his own device at the end of the war, Romodi was a battle-scarred veteran, and he became one of the first generals in the new Imperial Army. Alongside Wilhuff Tarkin, he contributed to the pacification of the unruly Western Reaches.[4] In the aftermath of the Battle of Ogoth Tiir, he took reconstruction initiatives, which later became a subject of discussion in Colonel Julyan's Strategy and Tactics class at the Arkanis Academy.[8] Romodi supervised the distribution of the Imperial Military across numerous troublesome sectors.[5]
Imperial summit[]
- "Phased, widespread deployment will ensure a secure military presence across all sectors."
- ―Hurst Romodi
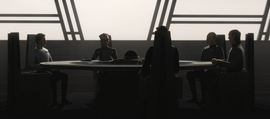
General Hurst Romodi attended a summit on Eriadu to discuss the future of the Imperial Military alongside Admiral Coburn, Dr. Hemlock, Commander Krennic, and Governor Tarkin.
In around 18 BBY,[10] Romodi attended one of the earliest meetings of what would soon become the Joint Chiefs of the Imperial Military[6] at the Raven's Peak on Eriadu, along with Governor Wilhuff Tarkin, Admiral Barton Coburn of the Imperial Navy, Commander Orson Krennic of Advanced Weapons Research, and Doctor Royce Hemlock of Advanced Science Division.[9] The general, who was was considered one of the Empire's high-level leaders,[11] first put forth his ideas for Imperial military presence in the galaxy before listening to updates from Hemlock on the progress of the Advanced Science Division's cloning efforts. After he heard Hemlock mention that they were using decommissioned clone troopers as test subjects, he asked if they had agreed to be a part of the project, to which Hemlock responded that they were Imperial property and had no say in the matter. Romodi later listened to Krennic speak about Project Stardust before groups of infiltrators, namely Saw Gerrera's Partisans and Clone Force 99, were discovered in the base. Explosives were later detonated and Romodi and the other officers were secured in their conference room.[9] Romodi and the other officers remained present in the conference room while Tarkin was briefed on the situation by Lieutenant Maylur and relayed further orders.[12]
Early rebellion[]
- "I thought I was sent to find Captain A'Shar Farless, but perhaps I was mistaken. Shall I inform Governor Tarkin that he has arranged a meeting with the wrong officer?"
"Greetings, General Romodi, sir. No need to contact the Governor." - ―Romodi, and Farless, upon Romodi encountering the latter playing with his droid
Romodi eventually left active military duty. However, Tarkin extended a personal invitation to his old friend for help with the DS-1 Death Star Mobile Battle Station's final preparations, to which Romodi accepted.[14] Eventually, Romodi was present at the Imperial Center of Military Research on the planet Scarif with Tarkin, who had visited the facility.[13] The facility housed information on various Imperial projects, including the technical readout of the Death Star.[15]
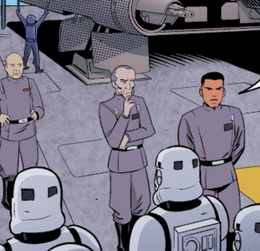
Romodi accompanied Tarkin on a visit to Scarif.
The facility's personnel were lax in their responsibilities, and Tarkin believed that the Imperial personnel assigned to Scarif were vulnerable to infiltration. As such, Tarkin sent General Romodi to locate Captain A'Shar Farless who had recently arrived with his companion droid, DT-JZ. Romodi and two of his officers located the young captain and his droid aboard a Lambda-class T-4a shuttle having a playful discourse. When Romodi threatened Farless with informing Tarkin that he must have found the wrong officer he was sent to retrieve, Farless stood at attention and addressed Romodi's concerns. Farless and his droid then followed Romodi to an office, where Tarkin held a speech to the group of officers at attention regarding the importance of their posting. Romodi stood toward the rear of the room, near Dark Lord of the Sith and Emperor's Fist Darth Vader and Director of Advanced Weapons Research Orson Krennic.[13]
After Tarkin concluded his speech, Romodi thanked him for the speech and dismissed the officers to return to their squads with their orders. Tarkin and Farless then undertook a tour of the facility, while Farless' droid was stowed away in a shuttle. After Tarkin and Farless finished their walk and conversation, Farless addressed his squad on the landing pad. Romodi stood by Tarkin while Farless delivered his speech. Romodi commented to Tarkin his disbelief that Farless was the best of the Imperial Academy, and that his remarks to his subordinates were borderline insubordination. Tarkin expressed displeasure at Romodi's remarks, asking Romodi if he was questioning his judgement and threatening Romodi with taking charge of the operation at Scarif. Romodi detracted, and stated that Farless was a credit to the Empire. As Farless continued his speech, Tarkin and Romodi quietly boarded the shuttle holding DT-JZ and left, separating the two companions.[13]
Some time later,[15] in 1 BBY[16] Romodi was present in the Death Star's Overbridge during the destruction of Jedha City with a large audience of Imperial officers, including Grand Moff Tarkin and Director Krennic. Romodi watched the test firing of a single reactor and the resulting cataclysm that annihilated Jedha City. After the test, Romodi spoke with nearby Imperial officers until Tarkin directly congratulated Krennic and then assumed full command of the battle station, much to Krennic's discontent.[15]
Battle of Scarif[]
- "Sir, it's Scarif base. They're reporting a rebel incursion."
"I want to speak with Director Krennic."
"He's there, sir. On Scarif."
"The original plans for this station are kept there, are they not?"
"They are."
"Prepare for the jump to hyperspace and inform Lord Vader." - ―Romodi and Tarkin
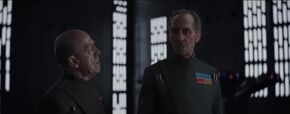
Romodi and Tarkin during the Battle of Scarif.
Romodi received a report from General Sotorus Ramda that a Rebel incursion was occurring on Scarif, where the technical blueprints of the superweapon were kept. After relaying that information to Tarkin, Romodi was instructed to prepare the battle station's jump to hyperspace and inform Lord Vader of the situation. Once on the premises, the general enthusiastically suggested to target the Rebel Fleet with the Death Star, which Tarkin refused, stating Lord Vader will handle the fleet.[17] Instead, the Grand Moff ordered a single reactor ignition and had it targeted at the Citadel Tower on Scarif. Romodi then gave directions to his aides to carry out Tarkin's order, and the superlaser fired, destroying the tower and impacting the planetary surface several kilometers away.[15]
Nevertheless, the Empire's actions at Scarif proved insufficient. Prior to the destruction however, the Rebels had managed to transmit the plans of the Death Star to Princess Leia Organa aboard the consular ship Tantive IV.[15] Although Lord Vader and his flagship the Devastator managed to capture the Tantive IV above Tatooine,[2] Romodi feared that further leakage may have occurred during the interception. The general then sent Tarkin a high-priority communique, advising him to take immediate action to neutralize political and military opposition.[7]
Prelude to Yavin[]
- "It was lucky [Tagge] left the station before its destruction to return to his beloved fleet, or I would have no one I could use."
- ―Emperor Palpatine
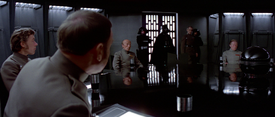
Romodi was on the Death Star when Tarkin announced the dissolution of the Senate.
Shortly after, General Romodi participated in a meeting of the Joint Chiefs[6] in the Death Star's conference room, during which Tarkin announced the disbanding of the Imperial Senate and Darth Vader assured that the stolen plans would soon be back in the Empire's hands. While Romodi's fellow General Cassio Tagge expressed concerns that the Rebel Alliance may discover a flaw in the Death Star, Admiral Conan Antonio Motti brushed those aside. Eventually, the Death Star was brought to the Yavin system to confront Rebel forces over their headquarters on Yavin 4.[2]
However, Tagge had correctly assessed the rebel threat. Exploiting the presence of a thermal exhaust port in the superweapon's structure that had been deliberately designed by the scientist Galen Erso to be unstable,[15] the Rebellion launched a successful assault on the Death Star, resulting in its explosion and the loss of every life on board including Governor Tarkin.[2] Both Tagge[19] and Romodi survived the destruction of the Death Star.[20] However, even though Romodi had been highly favored,[7] Emperor Palpatine chose to promote Tagge to Grand General, and placed him in charge of the entire Imperial Military,[19] commenting that there remained "no one else he could use." Following the War on Shu-Torun, Tagge was then demoted for failing to stop the rogue cyborg agent Cylo and Vader executed him after being placed in charge of Death Squadron.[18]
Bidding for Solo[]
- "This is ludicrous. Han Solo is a key member of the Rebel Alliance. Why are we not simply taking him? His value as a source of intelligence is incalculable."
- ―General Romodi, to Sub-Administrator Moore
At some point between 3 ABY and 4 ABY,[21] Romodi received an invitation from the criminal organization Crimson Dawn to an event where the captured Rebel Captain Han Solo would be put up for auction.[22] He subsequently attended the auction, accompanied by[20] Sub-Administrator[22] Sly Moore and several officers. While the general thought that they should simply seize Solo instead of bidding, Moore objected that it would damage the Empire's working relationships with the criminal syndicates in attendance. Therefore, Romodi reluctantly agreed to let Moore use her innate Force abilities to prevent others from outbidding the Imperial delegation. Nevertheless, the sub-administrator's powers proved useless against the Hutt crime lords in the room, and Jabba Desilijic Tiure raised the bidding to one million credits, to Romodi's great displeasure. At that moment, much to everybody's surprise, Lord Vader himself made a striking entrance, claiming Solo for himself.[20]
Battle of Endor[]
Shortly prior to the Battle of Endor[23] in 4 ABY,[16] Romodi served as one of Fleet Admiral Firmus Piett's officers aboard the Executor, a Star Dreadnought that served as the flagship of Darth Vader's Death Squadron. After the Executor arrived on station ahead of schedule above the Forest Moon of Endor, Piett had an episode where he reminisced about his life and witnessed a hallucination of his mentor and predecessor, Admiral Kendal Ozzel. After Piett's outburst, Piett opened his eyes and saw Romodi in the hallucination's place, looking concerned. Piett apologized to Romodi, and Romodi raised his eyebrows and bowed slightly, leaving Piett alone on the bridge.[23] In the subsequent battle, Piett and the command crew perished when an RZ-1 A-wing interceptor crashed into the bridge, and sent the Executor careening into the DS-2 Death Star II Mobile Battle Station and exploding.[24]
Legacy[]
Hurst Romodi was mentioned several times by the historian Beaumont Kin in his book, The Rise and Fall of the Galactic Empire, which was released following the Battle of Exegol in 35 ABY. Kin assumed that the general had died at Yavin, along with Tarkin, Motti, and others,[6] when in fact he had lived to see the Battle of Endor.[23]
Personality and traits[]
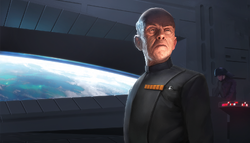
General Romodi was a veteran officer of the Republic and Empire.
Romodi was a light-skinned man with brown hair, which had heavily receded and started to turn gray by the time of the Battle of Scarif. One prominent vein could be seen bulging at his right temple.[15] An experienced officer who had been through many battles, Romodi felt proud and enthusiastic about the technological terror of the Death Star.[17] As a veteran of the Clone Wars, Romodi had witnessed the destruction possible in a chaotic galaxy.[5] He had the favor of the Galactic Emperor himself.[7] Romodi put alcohol in the standard-issue caf the Empire served to make it more enjoyable.[25] Due to wartime injuries, his lungs and heart had cybernetic grafts.[5]
Equipment[]
In his capacity as a General, Romodi wore a field gray-green, crease-free Imperial officer uniform made of gaberwool, like many other Imperial officers wore. On the left side of the upper chest, he sported a rank insignia plaque consisting of six yellow tiles arranged in a single row.[4] He owned a bronze and silver flask for drinking.[25]
Behind the scenes[]
- "He may not be your favorite Star Wars character, but General Hurst Romodi is one more familiar face that popped up in both Rogue One and A New Hope. That's right, in addition to Grand Moff Tarkin, Ponda Boba [sic] and Dr. Evazan, another baddie from the very first Star Wars film showed up in Rogue One. And this time, he had something to say."
- ―A 2017 Inverse.com article about Romodi
The character of Romodi first appeared in the novelization of the 1977 movie Star Wars: Episode IV A New Hope, released several months prior to the film. Attending a meeting aboard the Death Star, he delivers a line[27] that is instead given to Admiral Motti in the movie.[2] Although his appearance in the novel rendered him a part of Expanded Universe continuity, it was unclear if Romodi actually appeared in the film until 2012 when author Jason Fry confirmed that he was the "bald guy" present at the meeting;[28] a character whom the fan website Aveleyman identifies as being portrayed by Ian Selby,[29] an actor listed as an Imperial Bureaucrat by Ann Skinner's continuity notes.[30] In that same year, Fry and Paul R. Urquhart provided the first name of "Hurst" in the reference book The Essential Guide to Warfare.[31]
Romodi was first named in the 2015 novel Servants of the Empire: The Secret Academy, also written by Fry.[8] Fry confirmed on his Twitter account that he intended him to be the Romodi from A New Hope.[32]
During the development of 2016's Rogue One: A Star Wars Story, the production crew took a look at everyone who is seated around the Death Star conference table in A New Hope, trying to pinpoint a character that could be easily recast to make an appearance in the new movie. Eventually, Romodi was chosen,[33] and Andy de la Tour went on to portray the general in Rogue One. The full name of "Hurst Romodi" was given in the film's end credits.[15]
On the social network Twitter, several French fans have humorously pointed out the resemblance between de la Tour's Romodi and the Mayor of Bordeaux Alain Juppé, prompting several French-speaking online media outlets to relay the information.[34][35][36]
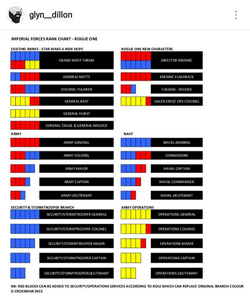
Imperial Forces Rank Chart released by Glyn Dillon and created by David Crossman for Rogue One
According to Glyn Dullon's chart, Romodi's rank plaque also indicates that he may be an Operations General, most likely Chief of Battle Station Operations, as in Legends.
Appearances[]
Sources[]
 Star Wars Helmet Collection 1 (Weapons & Uniforms: Imperial High Command) (Picture only)
- Star Wars: Rogue One: The Ultimate Visual Guide
The Star Wars Show: Rogue One Secrets Explained on the official Star Wars YouTube channel (backup link) (Posted on StarWars.com)
- Star Wars: Absolutely Everything You Need to Know, Updated and Expanded
- Star Wars: Geektionary: The Galaxy from A - Z
- Star Wars: The Rebel Files
 Star Wars: Armada — Onager-class Star Destroyer Expansion Pack (Card: General Romodi)
 Star Wars: Armada — Upgrade Card Collection (Card: General Romodi)
 "From Scarif to Yavin: The Psychology of War" — Star Wars Insider Special Edition 2021 (Picture only)
 Disney Gallery: The Mandalorian — "Making of the Season 2 Finale"
 "A Certain Point of View" — Star Wars Insider 207
 "The Summit" Episode Guide | The Bad Batch on StarWars.com (backup link)
- Star Wars: Dawn of Rebellion: The Visual Guide
 "A Certain Point of View" — Star Wars Insider 223 (Picture only)
- Star Wars: The Rise and Fall of the Galactic Empire

