- "Starlight Squadron heads out on its first mission. It could change everything."
- ―Leia Organa
Starlight Squadron was a starfighter squadron, consisting of elite pilots of the Rebel Alliance, that served the Alliance's Fourth Division during the Galactic Civil War.
Description[]
- "Do you like your team?"
"I do. Great pilots, all of them. Reliable. Especially L'ulo. I like the name too – Starlight Squadron. Has a nice ring to it." - ―Kes Dameron and Shara Bey
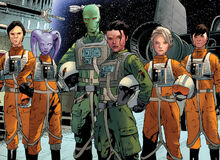
Starlight Squadron was composed of a mix of RZ-1 A-wing interceptors and T-65B X-wing starfighters,[1] that served in the Rebel Alliance's Fourth Division during the Galactic Civil War.[7] The squadron's starfighters were flown by elite Rebel Alliance pilots,[1] led by Lieutenant Shara Bey.[2] Staff officers included Commander Wedge Antilles, Captain L'ulo L'ampar, and Lieutenant Evaan Verlaine. Other members included Mart Mattin and Freyta Smyth.[1] Jedi Commander Luke Skywalker briefly assisted the squadron on a mission to Ab Dalis.[3] The squadron received its orders directly from General Leia Organa. The squadron's starfighters, flight helmets and flight suits were emblazoned with an insignia, which consisted of a red starlight burst, occasionally with a vertical black stripe background.[1]
History[]
Formation[]
- "If you find anyone, warn them that the Empire has cracked our communications and give them the new Trawak code Threepio and his team developed."
- ―Leia Organa

Starlight Squadron members
Following the evacuation of Hoth in 3 ABY,[8] the Rebel Alliance scattered its fleet to secret rendezvous points across the galaxy. The Galactic Empire, however, had cracked Alliance communications because of a signal analysis protocol developed by Commander Ellian Zahra and her forces continued to attack the divided fleet.[9] With no way to communicate with Alliance forces across the galaxy, Commander Grek devised a plan to reassemble the scattered fleet divisions, named Operation Starlight.[10] Shortly after, Starlight Squadron was formed with the most elite pilots available within the division as well as some from the Seventh, and tasked with undertaking dangerous missions on behalf of Operation Starlight.[1]
Operation Starlight[]
Search near Felucia[]
- "No…This can't be."
"It can, Shara, and it is. I'm picking a few lingering transponders. This was Sixth Division. The Empire got here first." - ―Shara Bey and L'ulo L'ampar

Starlight Squadron discover wreckage of the Sixth Division near Felucia
In 3 ABY,[6] Starlight Squadron took part in their first mission for Operation Starlight, led by Starlight Leader Lieutenant[2] Shara Bey, upon which they were tasked by General Organa with finding the scattered divisions of the Rebel Alliance fleet, to warn them that the Galactic Empire had cracked Alliance communications and to deliver a new Trawak security code that C-3PO and his team had developed. During their search, the squadron discovered wreckage of the Sixth Division near Felucia. Commander Wedge Antilles noticed there were signals all around them, to which someone else noted that they were Imperial signatures. Captain L'ampar (Starlight Three) spotted Imperial probe droids waiting nearby and quickly realized they got setup. The Starlight pilots took evasive action, but the probe droids latched onto the astromech droids of the squadron's X-wings and attempted to access their archives by drilling into their conical domes. Fearing the probe droids might get the coordinates of the other rendezvous points, Antilles suggested shooting them off, however Shara Bey questioned their ability to actually pull it off. Instead, Bey ordered all pilots to set their astromech's self-destruct and eject them, which meant losing their nav data and making it difficult to get back to the fleet. With no other choice, the droids ejected and detonated, saving their valuable data from the Empire.[1]
Ambushed by the Tarkin's Will[]
- "This is bad. They've got us surrounded, they're jamming our long-range comms and without our astromechs, the X-wings can't escape into hyperspace."
"Just keep flying, Freyta! L'ulo and I can link our nav computers with yours and share jump data. As long as we're alive, there's a chance." - ―Freyta Smyth and Shara Bey

Tarkin's Will and its TIE fighters ambush Starlight Squadron
With no time to catch their breath, the Imperial II-class Star Destroyer Tarkin's Will arrived and ambushed the squadron.[1] The Star Destroyer launched a swarm of TIE fighters which outnumbered the Rebel starfighters three to one. Mattin (Starlight Four) suggested the A-wings leave while they still had a chance, as there was no way they could coordinate a hyperspace jump during a dogfight without their astromechs. However, Bey made it clear that she was staying to fight. After studying the TIE's tactics, L'ampar noticed the TIEs were not ganging up on individual starfighters, per the Imperial Tactical Manual when outnumbering the enemy, and quickly realized they were being herded. The Tarkin's Will engaged its tractor beams, catching the squadron's starfighters to bring them in for interrogation. Evaan Verlaine and Antilles agreed that using brute force to try to escape would not work. Antilles then suggested a maneuver that the Rebel pilots war-gamed back in Rogue Squadron but was untested. The maneuver involved accelerating full throttle and riding the tractor beam toward the Star Destroyer. As they did this, the Imperials aboard the Tarkin's Will remained unfazed, as the starfighter tactics gave the impression the Rebels were planning to ram the Star Destroyer in a last-ditch suicide mission. As soon as the shields dropped to pull the starfighters in, the squadron targeted the tractor beam projectors and fired their concussion missiles and proton torpedoes, destroying it. With the tractor beam offline, and the Star Destroyer's targeting computers unable to lock on due to their speed, the Starlight starfighters raced into the hangar, and fired upon the TIE fighters and stormtroopers within. This prevented more TIEs from scrambling from the Tarkin's Will.[4]
Escaping the Tarkin's Will[]
- "Shara! Don't give up. We can fight off these AT-STs, then steal you a ship. We can do this…I know it!"
"Don't be foolish, L'ulo. You've got your chance to get back to the fleet—take it." - ―L'ulo L'ampar and Shara Bey

Starlight pilots fight aboard the Tarkin's Will
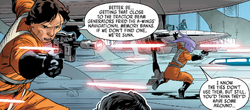
Mattin and Verlaine's X-wings stood guard to keep the TIEs that were chasing them, out of the hangar, while L'ampar's A-wing covered the interior access door from stormtroopers. With the hangar temporarily locked down from further Imperial threats, the rest of the pilots landed and disembarked their ships. Getting close to the tractor beam generators had fried the A-wings' navigational memory banks, so Bey and Freyta Smyth scrambled to a group of Imperial astromech droids sitting idle nearby, while Antilles provided cover fire. Smyth sliced into one of the astromechs, and was surprised that it wasn't using tough encryption. Bey ordered Smyth to get the astromech back to an X-wing and start running the hyperspace calculations, while she stayed behind to do something.[4]

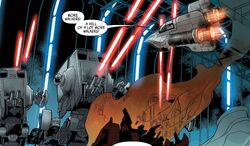
L'ulo L'ampar engages AT-STs aboard the Tarkin's Will
Just as L'ampar destroyed an AT-ST walker, more entered the hangar. Antilles urged Bey to hurry as the Imperial astromech, who was in his X-wing, almost finished the nav calculations and all their ships were linked and ready to go. Bey explained that she was able to steal all kinds of valuable intelligence from the other Imperial droids in the hangar, which they could take back to the fleet. As Bey raced back to her A-wing, but it was destroyed by an AT-ST, leaving her stranded. On witnessing this, L'ampar told Bey not to give up, as Starlight would continue to fight the AT-STs and steal her a ship. However, Bey recognised the foolishness of these actions, as staying to help would lose them their only chance to get back to the fleet, and so she issued a direct order to L'ampar to go, along with a request for him to tell her husband Sergeant Kes Dameron that she loved and have him kiss their son Poe for her. L'ampar reluctantly acknowledged the order and the squadron left without her.[4]
Returning to the fleet[]
- "…the mission so far has been unsuccessful. We found the remains of Sixth Division—it was completely destroyed. Then we were ambushed by the same Star Destroyer that's been hunting us across the galaxy. We had to board the Destroyer and fight our way clear. We made it…but we had to leave Starlight Leader behind. It…kills me to say that, we had no choice. She sacrificed herself to save us."
- ―L'ulo L'ampar, to the Alliance Fleet

Starlight Squadron return without their leader
On the way back to the fleet, L'ampar, now Starlight Two, sent the Fourth Division a transmission, stating the mission was unsuccessful. He mentioned finding the remains of the Sixth Division, and the ambush by the same Star Destroyer hunting them across the galaxy. L'ampar also mentioned the fighting on it that resulted in leaving Starlight Leader behind, which Kes, who was listening in, was sad to hear. L'ampar finished off with the only bit of good news, regarding the capture of the Imperial astromech droid with its memory banks full of useful navigational data, which was Bey's idea and one that Organa planned to utilize for the Operation and in hunting down Zahra before she did anymore damage to the Rebel Fleet by locating the Tarkin's Will.[4]
Hiding on Tarkin's Will[]
- "I'm okay. I managed to slip away off the hangar deck before I was captured. Star Destroyers are as big as cities. Lots of places to hide."
- ―Shara Bey, to Kes Dameron

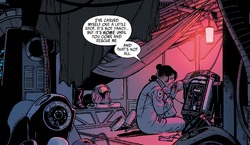
Shara Bey hides on the Tarkin's Will
Later, Bey managed to slip away off the Star Destroyer's hangar deck before she was captured. She managed to find a place to hide somewhere on the city-sized starship and dismantled one of the Imperial astromech droids to raise communication with the Forth Division, where she was able to talk to her husband, much to his relief. Bey told Dameron that she was working on slicing into the Imperial systems and she was going to make herself useful getting more valuable information until such time as a team could be sent to rescue her. Bey then debriefed General Organa on the intelligence she already gathered while in hiding.[2]
Battle of Ab Dalis[]
Starlight Squadron started to resume it's search across the unexplored rally points with the help of Antilles' good friend aspiring Jedi Commander Skywalker since they were down one member until Lieutenant Bey got off the Tarkin's Will. Their journey's next destination was the planet Ab Dalis. The Eleventh Division was currently in an intense battle against Admiral Kalaxo who was in command of the Imperial Star Destroyer Ultima II and a member of Commander Zahra's Hunter Fleet. His ship was below a dormant volcano which the squadron had reignited using their proton torpedos and died in the blast. Skywalker then told Antilles he had to depart for Jekara to help General Organa and Lando Calrissian save his friend and Organa's lover Captain Han Solo from an auction hosted by Crimson Dawn because he had a vision revealing his father Sith Lord Darth Vader was coming after the owner of the Millennium Falcon. Antilles understood since he knew how important Solo was to the Rebel Alliance and gave the new Trawak security code to the Eleventh Division. Starlight Squadron had boosted the rebel fleet's strength by fifty percent and brought back two of it's leaders, Chancellor Mon Mothma and Admiral Gial Ackbar.[3]
Rescuing Lieutenant Bey[]
Sometime after the Battle of Ab Dalis, Bey's cover as a stormtrooper was blown when Warrant Officer Kronauer saw her armor was damaged since that caused to Commander Zahra discover there was a mole on the Tarkin's Will due to her second-in-command Lieutenant Gorr pointing out there was no stormtrooper on her ship with the com number TK-510 and found out about Bey's coded transmissions so she learnt Bey survived the destruction of her ship and hid in the damaged part of the Star Destroyer since internal scanners couldn't detect anything there. When Bey's plan to steal a Lambda-class T-4a shuttle went south and was apprehended by Zahra, Starlight Squadron and a small group of Pathfinders led by Kes, decided to rescue his wife without permission from Mothma and the other rebel leaders.[11]
After recovering the equipment and intelligence she stole as well as learning her impressive story, Commander Zahra demanded Bey tell her about the new transmission code, what the Rebel Fleet's targets are, and who was still alive after the Battle of Hoth or else she would go after Poe and his maternal grandfather. Then Starlight Squadron and the Pathfinders who were aboard a UT-60D U-wing starfighter/support craft dropped out of hyperspace and engaged the swarm of TIE fighters from the Tarkin's Will again to extend the fight. Sergeant Dameron and his team got aboard the battle damaged Star Destroyer but it jumped into hyperspace when Commander Zahra changed her plan from stopping Starlight Squadron from rescuing Lieutenant Bey to destroying the last division of the Rebel Fleet at the Battle of Panisia after she received intel on it's location from the Imperial Security Bureau and ordered the TIE swarm be left behind since there was no time to get them back aboard and to prevent the Rebel starfighters from escaping like they did at Felucia considering they were outnumbered and assured Gorr they would be picked up once they returned but if they were defeated then it would be of no loss as the Empire had zero tolerance for the weak in its forces. However Zahra was lured in a trap as the entire Rebel Fleet showed up to get the last division and finally kill the vengeful Commander as part of a plan developed by Lady Qi'ra, who was in charge of the criminal syndicate Crimson Dawn, to cause a distraction so her agent Deathstick could grab the Mourner's Wail Syndicate and the Unbroken Clan's heir Cadeliah and in an attempt to gain General Organa and the Alliance's trust to form a partnership with them for her master plan to kill Darth Vader and Emperor Palpatine so she can bring an end to the Sith and the Empire to make the galaxy an equal playing field for those who want power. Then after defeating the stranded TIE swarm, Starlight Squadron rendezvoused with the Rebel Fleet and had Lieutenant Bey lead them again since Dameron's mission to rescue her was a success but he lost his team since they stayed behind to destroy the main reactor on the Tarkin's Will to damage it and lower the shields so the Alliance could finally destroy it. Then Bey led her team into helping General Organa locate Commander Zahra after she survived the crash of her ship and after a brief fight in the cave she was hiding in, Organa emerged and said they would never have to worry about her again. However Organa was wrong because Zahra survived, although grievously injured, and joined a raider faction during a mission she embarked on with Verlaine and Skywalker to find a fleet of surviving Alderaanians they previously helped after the Battle of Yavin.
Behind the scenes[]
Starlight Squadron was first mentioned in Star Wars (2020) 6, a comic written by Charles Soule, illustrated by Jesús Saiz, and published by Marvel Comics[7] on September 16, 2020.[12] It later made its first appearance in Star Wars (2020) 10, a comic written by Charles Soule, illustrated by Jan Bazaldua, and published by Marvel Comics[1] on January 6, 2021.[13]
Appearances[]
- Star Wars (2020) 6 (First mentioned)
- Star Wars (2020) 10 (First appearance)
- Star Wars (2020) 11
- Star Wars (2020) 12
- Star Wars (2020) 13 (Mentioned only; in the opening crawl)
- Star Wars (2020) 14
- Star Wars (2020) 15
- Star Wars (2020) 16 (Mentioned only; in the opening crawl)
- Star Wars (2020) 19 (Mentioned only)
- Star Wars (2020) 21
- Star Wars (2020) 22
- Star Wars (2020) 23 (Mentioned only)
- Star Wars (2020) 24
- Star Wars (2020) 48 (Emblem only)
Sources[]
Notes and references[]
- ↑ 1.00 1.01 1.02 1.03 1.04 1.05 1.06 1.07 1.08 1.09 1.10 1.11 1.12 1.13 1.14 1.15 1.16 1.17 1.18 1.19 Star Wars (2020) 10
- ↑ 2.0 2.1 2.2 2.3 2.4 Star Wars (2020) 12
- ↑ 3.0 3.1 3.2 3.3 Star Wars (2020) 15
- ↑ 4.0 4.1 4.2 4.3 4.4 4.5 4.6 4.7 Star Wars (2020) 11
- ↑ Star Wars (2020) 24
- ↑ 6.0 6.1 Star Wars: Timelines dates the events of Star Wars (2020) 10, including the formation of Starlight Squadron, to 3 ABY.
- ↑ 7.0 7.1 7.2 7.3 7.4 Star Wars (2020) 6
- ↑ Star Wars: Galactic Atlas
- ↑ Star Wars (2020) 1
- ↑ Star Wars (2020) 2
- ↑ Star Wars (2020) 21
- ↑
Star Wars (2020) #6 on Marvel Comics' official website (backup link)
- ↑
 Starlight Squadron Blasts Off in Marvel's Star Wars #10 – Exclusive Preview on StarWars.com (backup link)

