- "Confer on you the level of Jedi Knight, the Council does."
- ―Yoda
Now that you've got the hang of the basics with the Padawan tutorial, it's time to move on to a few of the more complex tasks that editors might want to complete on Wookieepedia. Some of these are more nuanced or advanced versions of tasks you will have previously completed, while others are whole new processes to learn.
Take your time to get comfortable with each of them, and don't forget that you can always test them out in the sandbox first if you don't want to dive straight in to editing live pages. Help with any of these topics is also always available on our Discord server, so don't be afraid to ask for further guidance!
Customizing your skin and interface
Before diving into to the more complex tasks, it's a good idea to start personalizing your Wookieepedia experience to best suit your needs. There are two places you can start doing this: your preferences page and the toolbar. Each of these will allow you to activate a number of options that will either make life easier or give you access to more features.
Preferences
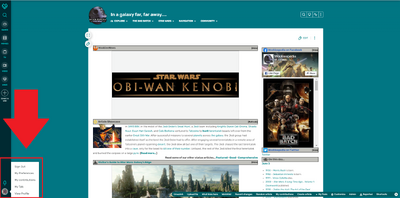
Preferences can be found in user icon dropdown.
Your preferences page can be accessed from the drop down menu found by hovering your cursor over your user icon below the notification bell in the bottom left corner of your screen (you can also quickly access your talk page and profile from here). Once on the preferences page you'll see a number of tabs. We won't cover everything here as there's a lot of options and many are fairly self explanatory; however, there's a few things worth highlighting that might otherwise escape your notice.
The first of these are located on the Editing tab. First, we'd strongly recommend ticking "Prompt me when entering a blank edit summary", as it is always encouraged to add a summary of any edit you make in order to provide more information to other editors who might see the edit in an activity feed or when looking at a page's history. Ticking "Warn me when I leave an edit page with unsaved changes" is also a good way to ensure you don't accidentally lose work by closing a tab or refreshing a page without saving. The Preferred editor dropdown on the Editing tab also allows you to change the format of your page when you make an edit; we'd always recommend "Source editor" as the other modes can interfere with certain types of page formatting.
The Gadgets tab also contains several features we'd suggest you turn on. If they aren't ticked, then we'd recommend the following boxes be ticked as quality of life improvements while editing: "Add a red dotted border around text that has changed in diffs" (lets you see changes when comparing different versions of a page), "Highlight all redirects orange," "Reference Tooltips: Roll over any inline citation to see reference information, instead of having to jump away from the article text," and "Highlight duplicate links in articles."
Toolbar
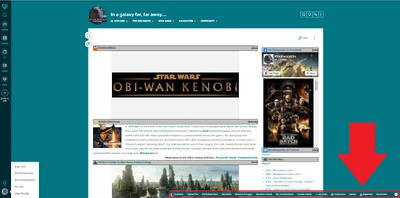
A customized toolbar
Moving on from preferences, the toolbar can be found at the bottom of your screen on any page. If you can't see it, then you might need to click the small arrow in the bottom right corner of the screen to unhide it. To start with the bar will be pretty empty, but you can add many different features by using the Customize option. This will open a popup where you can search for different features.
Some of the most useful of these are fairly self-explanatory: "Upload file," "Watchlist," "Recent changes," and "Random article." One that is less obvious but equally useful is "What links here." When clicked on any page, you will be taken to a list of all the articles on the wiki that include a link to the page you were viewing. This is extremely useful when searching for more information on a stub article or cleaning up a redirect.
Play around with the options on both the preferences page and toolbar to tune your Wiki experience to what best suits your editing style, and if you can't find a feature you're looking for, then make sure to ask other users on our Discord. If it doesn't exist already then it might even be suggested to Fandom as a future improvement!
Uploading an image
Now that you've customized your setup, something that you may already have been keen to try out is uploading an image file to Wookieepedia; however, if you're a brand new user, this is something you might have to be a little patient about! For a user to upload an image to Wookieepedia, they must have an account that is at least four days old with fifty edits and a confirmed email address. If you don't yet meet these criteria then no need to worry, just focus on other areas of editing until you do. If you do meet all the requirements, then the first thing to do is take a look at our Files policy and decide what image you should actually upload.
Choosing an image
Before anything needs to be done on Wookieepedia itself, the first step is to prepare an image for upload. Images should always be of the highest possible quality, so make sure to use blu-ray over a DVD or stream and digital comics over physical scans. If you don't have access to the highest quality version then we'd recommend seeing if another user who does have access to the source can help you out.
Before uploading the image you should also crop it to best suit its purpose. For example, for a character's infobox image you likely just want to crop to their upper body or head and shoulders. When cropping, always try and keep the image width above 250px, as this is the width of an infobox and smaller images will leave blank space at the sides.
Filling in the upload form
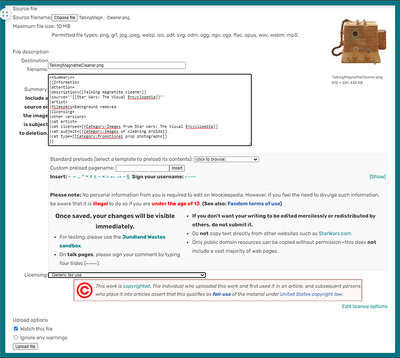
An example of a fully filled out upload form
Now that you've got your image file ready on your machine, open up the file upload form, which you've hopefully already added to your toolbar (if not then check out the first section of this guide!). Once you've selected your file to upload you can alter the name from what it's saved as on your computer by using the "Destination filename" field. There's helpful instructions at the top of the page to guide you through the form, but we'll run through the different parts here as well.
There are three compulsory fields in the form:
- Description: You must add a brief description of the image. This can be as simple as the name of the individual in the image, or can describe in more detail exactly what is occurring. Make sure to add links here, as it can be useful for tracking down images using the "What links here" feature.
- Source: You must include the source you obtained the image from. Generally this will just be a link to the page for the official piece of media, but if you are linking to a website make sure to properly fill out a Cite web template (as described below) or appropriate external links template. Multiple sources can be added here, although this is only generally needed if an image has separate sources in canon and Legends.
- Licensing: When adding the compulsory licensing information we'd heavily recommend using the dropdown menu located at the bottom of the "File description" section of the page, as otherwise you'll need to learn a variety of different short hand template names. Many options on the list are self-explanatory, but if you're unsure what to choose then ask another user for help.
If you fail to fill out these three fields then your image will likely be deleted.
The following fields are not mandatory, but you should try and fill them out every time you upload:
- Cat licensee: This field is where you add the category specifying the source of the image, for example: [[Category:Images from Star Wars: Episode IV A New Hope]]. (In many cases you just need to take the title from the source section and add "[[Category:Images from " on the front and some brackets at the end)
- Cat subject: This is where you add categories for everything appearing in the image, for example [[Category:Images of Luke Skywalker]]. Remember that as well as characters there's usually categories for images of places, professions, species, vehicles, and equipment.
- Cat type: This defines the medium of the image, for example if it's a screenshot from a live action film you'd use [[Category:Live-action images]], or for comic panels [[Category:Comic art images]]. If you aren't sure what the category for an image type is called then try checking other similar images or asking another user.
If you cannot fill out the licensee or subject category fields (for example if the source is an external non-official website without a category) then add skip to the field like this: |cat subject=skip
The final fields are only needed in specific circumstances:
- Attention: This field is used to tag images with templates like {{Imagequality}}, which marks the image as being of low quality and needing replacement. You can tag your own images with this, although if you feel this is needed then it's likely a better idea to see if another user can help you upload a higher quality version instead.
- Artist: This field should be filled in with a link to the illustrator for any images of illustrations, but should be left blank for things like live-action screenshots from films.
- Filespecs: If you've modified the image in any way, such as cropping it, then you should list the modifications here.
- Other versions: If Wookieepedia has alternate versions of the image, such as a different crop or textless version, then you should link them here as a small thumbnail
- Cat artist: If the artist field is filled out then you can add the category for that artist, for example [[Category:Images by Ralph McQuarrie]]
Once you've filled everything out, click the upload button at the bottom of the page.
Image placement within an article
With the image uploaded, there's one last thing to do: place it on a page! Images will generally be added to a page in one of two places, either as the article's main image in the infobox, or amongst the text of the body of the article. When adding it to the infobox, you should format it as just [[File:Filename.extension]], but when adding it to the body, there are a few additional parameters to add. Each of these will be separated with a vertical bar (|) between them, starting with "thumb" which should be added directly after the file name. This will make the image a thumbnail with a caption.
Next you should add either "right" or "left" to determine which side of the page the image will be shown on. If nothing is written here, the image will default to left. Images in the body of an article should almost always alternate left to right (not necessarily including the infobox image), with the only exception being certain "Behind the scenes" images.
The third parameter is the size of the image which should be formatted as a numerical value with px after it, e.g. "250px", which is a good size to start at and then tweak to best fit the page. The final parameter is the caption for the image, which can just be written as plain text. Remember to make sure you use the correct punctuation; a full stop should only be used at the end of full sentences. With all this info, your image should now look something like this in the editor:
[[File:Darth Vader.jpg|thumb|left|250|Darth Vader was a Sith Lord.]]
Redirects
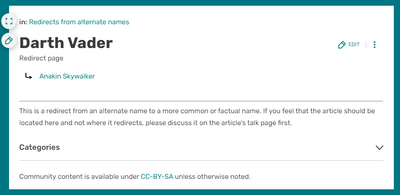
The redirect page for Darth Vader.
Redirects are an extremely simple article type that are used to redirect readers searching for a page under an alternate title to the correct page. Making one is easy; you simply create a page with the redirect title you want and then add the following to it before saving:
#REDIRECT [[TARGET PAGE NAME]]
This will mean that if anyone types the redirected name into the search bar they see the correct title you have redirected to as a suggestion. Likewise, if someone includes a link to the redirected title on an article, then anyone clicking the link will be automatically redirected to the correct page.
Redirects should only be used for alternate names or nicknames provided for a subject by an official source. If in doubt as to whether a redirect is necessary, it's best to ask for other editors opinions on Discord. In some rare occasions it may be worth including redirects for common misspellings of a title, but generally these are only necessary for the most popular pages on the wiki and will be determined by community discussion.
Moving pages
When to move a page
There are several reasons you might need to change the name of an article, mostly commonly because the title contains a typo or because a new source has provided a more preferable name for the subject. You may also need to move a page so that another page can be moved to the page's original title, but this is a complex task and requires the aid of an admin and so won't be covered here.
Before moving any page, always click the "What links here" button on your toolbar. This will let you see a list of every page that currently links to the page you are viewing. Remember: if you move a page, then all of these links will be affected! Keep this "what links here" page open on a separate tab while carrying out the move, as we'll need to come back to it later.
The move page form
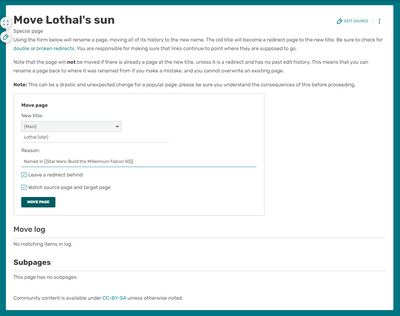
A properly filled out page move form
To actually begin moving the page, click on the dropdown arrow next to your edit button and select "move page." This should open up the move page form, which has several key fields that need to be filled out. For now you'll most likely want to leave the dropdown on the first row alone, as it can be used to change what namespace the page is in, but this is only relevant for fairly advanced moves. On the second row, alter the current title of the page to what you think the new title should be. Make sure to pay attention to correct capitalization per the source and keep in mind the other rules of our naming policy.
Be sure to fill in the reason you're changing the title on the next row down and then take a look at the two tick boxes below. The first box determines if a redirect for the old name will be left behind when you move the page. If you're moving the page from an alternate title for the subject that is still correct, then you should always leave a redirect, but if you are moving a page due to a typo, from a conjectural name, or so that another page can be moved to the original title then you might want to leave this unticked. Keep in mind that if you do leave this unticked, then all of the links on that what links here page are going to become redlinks! It's up to you if you leave the third box ticked or not, as this simply determines if the page you're moving will be added to your personal watchlist.
Fixing redirects
Once these are all filled out, you can click "move page," but the task doesn't stop there! Once the page has been moved, you need to consider all the links that still target the original page. If the what links here page only has a short list, then you can easily go and manually change them yourself, but if there are hundreds or thousands of links, then it's best to add a request to the bot requests page clearly stating the old page name and the new page name that the links need to be changed to.
Date and note references
In the Padawan tutorial we covered adding basic references to a page, but there are some circumstances that require a more complex reference to be added. The most common of these are date references, which often require an explanation given that few sources explicitly give dates in the ABY/BBY format used in both canon and Legends articles on the site.
For example, nothing in the film Star Wars: Episode VI Return of the Jedi actually states that the film takes place in the year 4 ABY, so to date the events of the film to that year, we'd need to use another source like Star Wars: Galactic Atlas or The Essential Chronology that does explicitly date the events of the film to that year. However, if the subject of the article you're writing isn't explicitly mentioned in the dating source, you can't just make a direct reference to it, you'll need to explain the logic you're using to date the actions of that character.
For example, if you were writing the article for the character Vizam, you'd want to speak about the things he does in Return of the Jedi as taking place in 4 ABY, but of course Star Wars: Galactic Atlas doesn't mention what Vizam specifically is doing in 4 ABY, only that the general events of Return of the Jedi are taking place in that year. As such you'll need to explain this in the reference by wording it as follows:
<ref name="Date">''[[Star Wars: Galactic Atlas]]'' dates the events of [[Star Wars: Episode VI Return of the Jedi|''Star Wars'': Episode VI ''Return of the Jedi'']], which includes the appearance of Vizam, to [[4 ABY]].</ref>
This allows the indirect dating of Vizam's actions using a source that doesn't mention the character at all. Sometimes you may even need to go a step further and include a note that dates the events described in your article relevant to another stated date. For example, if no source directly provides a date for the events, but it does state that they took place 3 years after the Battle of Hoth, you'd need to use a date ref to explain the further steps you've taken to work out the date, stating the simple maths you used to work it out.
Citation templates and external links
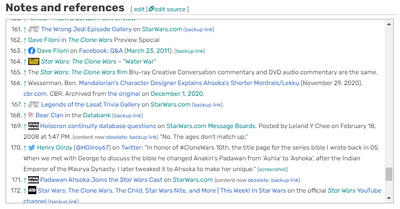
Wookieepedia has many different citation templates as seen here on the Ahsoka Tano page's reference list.
Wookieepedia uses a number of special citation templates to create specific formatting for some links in references and the appearances, sources, and bibliography sections of articles. There are far too many different citation templates to cover all of them here, so we'll only focus on a few examples that broadly represent the different levels of complexity; however, the best advice for using any template is to look at the template page itself where there should generally be instructions for its use.
For more complex templates with optional parameters, it's also often best practice to simply copy and paste the template from the template page into your article, then fill out the relevant parameters and remove any you don't fill. If you are confident enough to manually add some of the simpler templates, it's important to remember that they're always contained within curly brackets ({{}}) and use vertical bars (|) to separate the different parameters, with some complex templates also requiring parameter names.
Template:TCW
To start with one of the most simple and commonly used templates as an example, the {{TCW}} template is used specifically for any link to an episode of the Star Wars: The Clone Wars television show in the aforementioned article sections. All official Star Wars shows should have such a template, with most requiring just the name of the template and then the name of the episode as the first parameter. Thus, writing {{TCW|Ambush}} will give you this:
Star Wars: The Clone Wars — "Ambush"
Looking at the template page will also show that you can add a second parameter to change the formatting of the episode title. So for example if you wanted the episode title to be bolded you could add {{TCW|Ambush|'''Ambush'''}} and get this:
Star Wars: The Clone Wars — "Ambush"
Although it's unlikely you'd ever need to do this for a Clone Wars episode, other templates use similar parameters and so it's useful to understand how these sort of parameters work. The final parameter of the TCW template is simply to add "d=y" if relevant, which will mark that the episode also has additional information in the Decoded format. So adding {{TCW|Ambush|d=y}} will give you this:
Star Wars: The Clone Wars — "Ambush" (Decoded)
Template:CSWECite
A slightly more complex template that you will often find used is the citation templates for The Complete Star Wars Encyclopedia. This is a good example of a template that has slightly more complicated implementation, as it should be used in references within an article, not in the sources list. When using it in a reference there are also two possible types of use. When using the template to reference a single entry in the encyclopedia, you use the following parameters:
{{CSWECite|''VOLUME''|''PAGE''|''ENTRY''}}
For volume and page you simply add the corresponding numbers (the volume is written in Roman numerals), while for entry you just add the name of the entry, so
{{CSWECite|I|20|Allashane, Jess}}
Gives you
The Complete Star Wars Encyclopedia, Vol. I, p. 20 ("Allashane, Jess")
However, for some articles you might need to reference information from multiple entries in a single citation. In this case, simply add "|multiple" as follows:
{{CSWECite|multiple}}
This will tell the template to add a specific message rather than the usual formatting:
The Complete Star Wars Encyclopedia (Mentioned in multiple entries, but without own entry)
Template:Databank
With internal linking templates covered, it's time to move on to the more challenging external links templates. These will always require a greater number of parameters, including backup links to archived versions of any external sites, so don't be afraid to ask for help if you get confused on your first few attempts. One of the simplest external links templates is that for the StarWars.com Databank. The template contains four parameters as follows:
{{Databank|entry=|title=|archiveurl=|archivedate=}}.
All four require the parameter title to function, so make sure to include these.
The "entry" parameter deals with the url of the databank page. As all basic databank entries share the "https://www.starwars.com/databank/" part of their url, the template will insert this for you, meaning you only need to add the specific databank entry title found after the slash. For example, just type "luke-skywalker" for the Luke Skywalker databank entry. Remember to keep it lowercase to match the url itself.
The "title" parameter deals with how we want the title displayed in the template, so this is where we can add formatting and capitalization. For the Luke Skywalker entry, this would therefore just be "Luke Skywalker," ensuring that the template doesn't display the lowercase letters or underscore of the url.
Now we get onto the slightly more complex bit. To ensure that we have a backup of the information in the databank entry should it ever be removed or updated, we need to archive the page on a suitable archiving site. Wookieepedia's preferred archiving site is archive.org which allows you to archive a page simply by copying the url into the "WaybackMachine" search bar at the top of the homepage and pressing the enter key. If the page has been previously archived, you'll be taken to a timeline of previous archival dates from which you can choose, otherwise it will ask you if you'd like to archive the page now.
Sometimes it can take a little while for a new page to be archived, but once it's complete you'll see a now archived version of the page with a new url. The url should consist of "https://web.archive.org/web/NUMBER/ORIGINAL_URL" the number located before the original url is the specific timestamp for this archived version of the page. You can copy just this number into the archivedate= parameter of the Databank template and then remove the archiveurl= parameter and the template will add a link to the archived version of the page.
If archive.org has trouble archiving a specific website, then archive.is is a viable alternative. Simply copy your url into the red bar at the top of the homepage in order to archive a page then once the archiving process is complete copy the entire url into the archiveurl= parameter of your template and add the date you archived it on to the archivedate= parameter. Dates should be formatted as YYYY-MM-DD. With one of these two archive links added, your template should now be good to go, but make sure you check the link in the template leads to the proper archived page before saving.
Template:WebCite
When we need to link to an external website that we don't have a special citation template for, we use the generic WebCite template. This one has a lot of parameters due to all the possible link types it needs to cover, but generally you won't be filling out all of them for any single link. Remember, any parameters you don't use should be removed on the article. WebCite looks like this:
{{WebCite|url=|text=|author=|date=|format=|work=|pages=|language=|quote=|archivedate=|archiveurl=|archivefile=|nobackup=|nolive=}}
Don't be intimidated, most of these are actually fairly self explanatory. Three parameters that are always required are:
- url, which is just the full url of the site you're referencing
- text is just the plain text title of the page that you want to appear as the link. You can copy and paste it from the webpage, although this will often be in all caps, which should be avoided.
- See below for fields related to archives and backup links.
The remaining parameters are optional depending on the site you're referencing. If available they should always be included, but if they aren't then that doesn't preclude you from using that site as a reference. If a parameter isn't filled in you should remove it from the template.
- author is where you can include the name of the page's author if it's given using the format "Surname, Firstname". If they have a page on the wiki you can add a link here. If there's multiple authors then list them all using ; as a separator.
- date is for the full date the page you are referencing was published if it is available. It should be written as YYYY-MM-DD, although if only month and year or just year are available then that is also acceptable.
- format only needs to be filled in if the page you're referencing isn't a standard html webpage, for example, if you are refencing a pdf file hosted online or a podcast.
- work is generally for the website hosting the page and should be linked either to a Wookieepedia or Wikipedia page. If neither is available then it can be removed and the template will default to linking directly to the homepage of the site itself.
- pages is primarily for PDF documents, where the page number can be added to the url
- language should only be filled in for pages in a language other than English.
- quote is where a relevant quote can be added from the page being cited, this is most useful for something like a podcast, where finding a relevant section can be more difficult.
- nolive is for if the linked page is removed then you can add a 1 here to have the template link primarily to the backup instead.
Backup links
Backup links help us preserve webpages after the original page is no longer active and accessible. Websites like StarWars.com often will retire webpages, leaving us with no way to know what information was on them without a backup. All web citation templates require backup links whenever possible, and you can see here how to create a new one or add an existing one to your citation.
| Instructions for providing a backup link
In accordance with our Sourcing policy, all links to external sites must include a link to a backup version, preferably using Internet Archive. Instances that do not include one of the following parameters will result in the page being placed in the maintenance category. Please only use one of the following parameters.
Note that for citation templates using a central repository (for example, Module:ArchiveAccess/SW), archivedate values must be added to the repository, and not on the individual instance of those templates. |
What now?
Once you're comfortable with all of these processes, you'll be well equipped to tackle the majority of mainspace articles on the wiki, so get out there and start editing! Even if you're confident in your abilities it'd be a good idea to join the conversation on Discord in order to keep up with what's happening in the community, ask for guidance, or just chat with fellow Wookieepedians. If you're keen to learn more about article writing standards and reviewing, please continue your journey with the Master tutorial!

