- "Kanan is on Governor Tarkin's Destroyer, the Sovereign. It's still here above Lothal, but it's scheduled to leave soon."
"Where to?"
"The Mustafar System?" - ―Sabine Wren and Hera Syndulla
The Sovereign was an Imperial I-class Star Destroyer belonging to the starfleet of the Galactic Empire, and served as Grand Moff Wilhuff Tarkin's flagship for a period of time years before the Battle of Yavin.
Characteristics[]
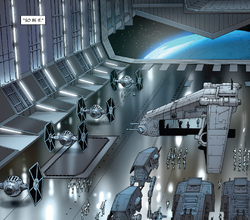
The Sovereign was an Imperial I-class Star Destroyer,[1] a 1,600-meter long capital ship with a basic armament of 60 Taim & Bak XX-9 heavy turbolaser batteries, 60 Borstel NK-7 ion cannons, and 10 Phylon Q7 tractor beam projectors.[13] The Sovereign notably housed an interrogation room, in which captives were tortured.[5] The Sovereign could carry LAAT/i gunships, TIE/ln starfighters, K79-S80 Imperial Troop Transports, and All Terrain Defense Pods.[7]
History[]
Invasion of Mon Cala[]
In 18 BBY,[14] the Sovereign was sent to Mon Cala.[7]
Abel LaSal's stolen identity[]
- "Sir, the roster shows a Commander Abel LaSal deployed aboard the Star Destroyer Sovereign, currently docked at Fondor. But the likenesses don't match up the way they should. Shall I contact the Sovereign?"
"That won't be necessary." - ―An Imperial specialist and Moff Tarkin
In 17 BBY,[15] Moff Tarkin was reassigned to Sentinel Base, an Imperial facility which oversaw the construction of the battle station[12] later known as the Death Star.[16] At some point, Abel LaSal was deployed on the Sovereign with the rank of commander, and a rebel cell forged LaSal's command cylinder codes, rank insignia plaque, and command cap disk.[12] In 14 BBY,[17] Sentinel Base was attacked by the rebel cell, drawing Tarkin away from the base and ultimately leading to the the group stealing his corvette, the Carrion Spike. The rebels then used the corvette to attack a series of Imperial facilities.[12]
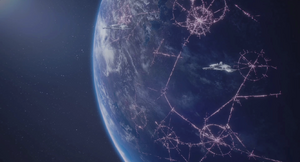
In 14 BBY, the Sovereign was stationed at Fondor (pictured).
In an attempt to intercept the Carrion Spike, Tarkin used the Imperial escort carrier Goliath to travel to the planet Phindar in the Mandalore sector, where the administrator of a taker facility was instructed to refuel the rogue corvette. The group's leader, Berch Teller, then used a disguise and LaSal's forged equipment to refuel. The Phindian administrator then provided Tarkin of a recording of Teller, whose code cylinder had identified him as Abel LaSal. The administrator also considered Teller's insignias to look legitimate. A specialist on the Goliath then informed Tarkin that LaSal was posted aboard the Sovereign, which was docked at Fondor,[12] a Colonies[18] planet that was home to the Fondor Shipyards used for capital ship repairs, manufacturing, and the development of classified technologies.[19]
However, the specialist noted that Teller's features, which included red hair and a facial scar, did not match LaSal's. Although the specialist asked whether to inform the Sovereign of this, Tarkin declined. Ultimately, Tarkin defeated the group and was granted the title of Grand Moff, with the Executrix becoming his personal vessel.[12] At some point, Abel LaSal served as the commander of the Sovereign. This was no longer the case[10] by 4 BBY,[20] however, as the Star Destroyer had become Tarkin's flagship.[10]
The Spectres[]
Arrival at Lothal[]
In 4 BBY,[21] Tarkin was informed by Assessor Potalla that staff at the Imperial Complex on[22] the Outer Rim Territories planet[23] Lothal had become complacent in their duties and allowed a rebel cell known as the Spectres to thrive. Hoping to deal with the situation personally,[22] later in the same year,[24] the Grand Moff travelled to the world aboard the Sovereign. After approaching Capital City, Tarkin left the Star Destroyer in a Sentinel-class landing craft along with two stormtroopers. The shuttle was then escorted to the Imperial Complex by two TIE fighters. Tarkin subsequently managed to captured the leader of the Spectres, Jedi Kanan Jarrus.[1] At some point, Admiral Kassius Konstantine was assigned to the Sovereign as Tarkin's second-in-command.[10]
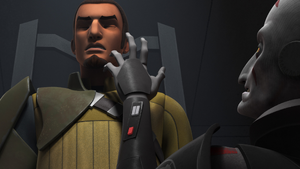
Kanan Jarrus was interrogated by the Grand Inquisitor.
Following this, Jarrus was brought to the Sovereign and restrained in an interrogation chair. Imperial Security Bureau Agent Kallus's interrogated the rebel with a mind probe delivered by an interrogation droid, in an attempt to reveal if Jarrus was truly a Jedi and to extract information about other rebel cells. The interrogation proved unsuccessful and was subsequently taken over by the Grand Inquisitor, a Jedi hunter of the Imperial Inquisitorius, who instead used torture via electrocution. However, Jarrus resisted this too, prompting Tarkin to suggest transferring the Jedi to somewhere that could extract a confession: the Mustafar system in[9] the Outer Rim Territories.[25] Meanwhile, the rest of the Spectres managed uncover their leader's location by infiltrating the Arquitens-class command cruiser Tellstar. The group learned that Jarrus was aboard the Sovereign which, although currently above Lothal, was scheduled to depart for the Mustafar system soon.[9] Before the vessel left, Kallus had departed.[5]
Rescue over Mustafar[]

The Sovereign (top center) with three other Star Destroyers
After arriving over the planet Mustafar, the Sovereign formed part of a fleet consisting of three other Imperial-class Star Destroyers and several Gozanti-class cruisers. From his flagship, Tarkin began sending an all-clear message to the rest of the fleet, which would result in reinforcements being sent if an interval was missed. Meanwhile, the Grand Inquisitor continued to interrogate Jarrus, questioning him about a larger rebellion and the identity of the rebel operative Fulcrum, a code name used by former Jedi Ahsoka Tano. The Inquisitor then taunted Jarrus about the death of his Jedi Master, Depa Billaba, during Order 66 and the rebel's decision to abandon his master and the Jedi Order.[5]
Subsequently, the Spectres arrived in the Mustafar system in a stolen Gozanti-class cruiser, Transport Ship 63378. After approaching the fleet, Jarrus' Jedi Padawan, Ezra Bridger, located his master using the Force. After transmitting their codes, the rebels' transport was cleared for docking by an Imperial technician on the Sovereign's bridge. The technician also informed Konstantine and Tarkin that ten TIE fighter reinforcements were inbound and ordered that Bay 5 be opened. After being cleared, the rebels launched their brightly painted TIE fighter on autopilot, which joined the other approaching TIEs in the hangar. One stormtrooper, JJR-579, commented that the rebels' fighter was not regulation, while another trooper, JTN-303, mused that they liked it. However, the TIE had been rigged with Electro Magnetic Pulse grenades, which were detonated by rebel Sabine Wren. The resulting pulse disabled the Sovereign and knocked out all stormtroopers[5] wearing a helmet.[26]
On the Star Destroyer's bridge, an Imperial officer informed Tarkin that the starship's main power had been lost. The Grand Moff then ordered that they go to auxiliary power. Meanwhile, Transport Ship 63378 docked to the Sovereign's starboard hull, with Bridger breaching a wall with his lightsaber to gain access for himself, Wren, Hera Syndulla, and Garazeb Orrelios,[5] who made their way to the cell wing.[26] On the Star Destroyer's bridge, Tarkin was informed by the officer that the Sovereign was down to emergency power and life support only. The Grand Moff explained that his all-clear message had been interrupted, meaning reinforcements were inbound. As he said this, two Sentinel-class landing craft departed another Star Destroyer and arrived in Bay 5, deploying a group of stormtroopers.[5]
Duel in the engine room[]

Kanan Jarrus and the Grand Inquisitor engage in a duel.
The stormtroopers immediately located the rebels in the Sovereign's corridors, although Bridger sealed a blast door with his lightsaber to cut the Imperials off. As he had cut off the only way to Jarrus, Bridger then used the ducts running above the corridor. Arriving in the cell wing, Bridger then freed his master. Meanwhile, the other rebels attempted to access a turbolift, only to find it full of stormtroopers. Although managing to kill several, the group was then pursued by the Imperial troopers. Bridger and Jarrus then arrived in the Sovereign's engine room, only to find the Grand Inquisitor waiting for them. Jarrus then charged the Jedi hunter using his Padawan's lightsaber, with a duel ensuing. Bridger then used the Force to pull his master's lightsaber from the Inquisitor's belt to join the engagement.[5]
However, after several blows, the Grand Inquisitor pushed Bridger and Jarrus away, before the hunter launched his lightsaber at Padawn, causing him to scream and fall off the walkway onto another below. Believing his student to have perished, Jarrus telekinetically retrieved his own lightsaber and proclaimed that he now had nothing left to fear, before attacking the Inquisitor once more. Meanwhile, the Sovereign's original stormtroopers were beginning to wake up, assisted by Tarkin's reinforcements. Using a smoke grenade to blind the troops, Wren and the other rebels then began to make their way to Bay 5.[5]
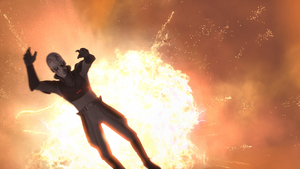
The Grand Inquisitor falls to his death.
Resolute in the power of the Force, Jarrus then overwhelmed the Grand Inquisitor, who used his double-bladed spinning lightsaber to defend himself. Jarrus then severed the lightsaber's hilt, sending them into the engines below. This caused an explosion, which rocked the Sovereign and filled the room with fire and smoke. The Inquisitor, who had overbalanced and was clinging to a walkway, decided to let go, preferring to fall to his death in the fire below rather than face the wrath of his master, Darth Vader. Bridger then revealed himself to Jarrus and the pair escaped the room.[5]
Destruction[]
On the Sovereign's bridge, an Imperial officer informed Tarkin that there was damage to the power core and that the hyperdrive was leaking. They then stated that the ship could not be held and that Tarkin needed to evacuate immediately for his safety.[5] Before the evacuation began,[26] Wren, Syndulla, and Orrelios reached the unattended Bay 5 and escaped in their painted TIE fighter as explosions began to breach the Sovereign's outer hull. However, by the time Jarrus and Bridger arrived in the hangar,[5] the evacuation had been completed,[26] leaving only the Inquisitor's TIE Advanced, which the Jedi used to escape before Bay 5 exploded. The Star Destroyer had begun to drift askew and descend towards Mustafar below, as more explosions engulfed its hull.[5]
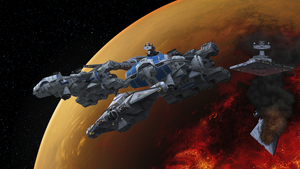
The Alliance sector fleet flees while the Sovereign (bottom right) explodes.
Following their escape, both rebel TIEs were pursued and fired at by Imperial fighters. The group had realised that their carrier, piloted by the droid C1-10P, had vanished. However, Transport Ship 63378 then arrived from hyperspace, accompanied by several CR90 corvettes and the Spectres' main vessel, the VCX-100 light freighter Ghost. These vessels,[5] the Alliance sector fleet led by Ahsoka Tano,[27] engaged the TIEs and allowed the Specters' TIEs to dock before the group escaped to hyperspace.[5] As the entirety of the Sovereign was engulfed in explosions, a Sentinel-class landing craft escaped the vessel and headed for another Star Destroyer. Aboard, Tarkin was informed by a pilot that the rebels had escaped.[5] The Sovereign then crashed on Mustafar's lava fields.[28]
Legacy[]
Immediate consequences[]
- "Agent Kallus, I've exhausted every resource to find information about the rebels, but there is nothing to be found! What more does Governor Tarkin expect?"
"He expects Lothal to be punished, Minister Tua. His own Star Destroyer was demolished by these rebels. He takes that somewhat personally." - ―Minister Tua and Agent Kallus
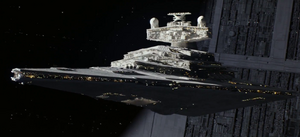
The Executrix became Tarkin's flagship following the loss of the Sovereign.
The destruction of the Sovereign not only embarrassed Tarkin but also displeased Emperor Palpatine himself.[10] Following the loss of his flagship, Tarkin returned to Lothal. Upon his arrival, Kallus informed the Grand Moff of reports of unrest across Lothal, due to whispers of the incident at Mustafar, with some viewing the Empire as weak and vulnerable. Tarkin told him not to worry, as the Emperor had also dispatched Darth Vader as an alternative solution to deal with the Spectres.[5] Following the incident at Mustafar, the Executrix once again became Tarkin's flagship.[16]
Tarkin expected Lothal to be punished after the destruction of the Sovereign, which he had taken personally. Agent Kallus relayed this expectation to Lothal's Minister Maketh Tua after her failure to gather information on the Spectres. Lothal was ultimately punished by Kallus and Vader, including an increased Imperial presence and the burning of the refugee camp known as Tarkintown.[29] Meanwhile, the Spectres were inducted into the rebel Phoenix Cell following Jarrus' rescue. A summary of the incident was sent to rebel General Davits Draven by Ahsoka Tano, who considered it a net victory for the rebellion. In another message to Draven, Tano cited the destruction of the Sovereign as a reason to give the Spectres more hardware and a support network.[27]
In an entry in her journal, the rebel Senator of Chandrila, Mon Mothma, agreed that the naval action at Mustafar was a short-term win. However, she noted that the Empire had become aware of the Rebel Alliance's naval strength and that security would be swiftly tightened throughout the Outer Rim in response to the loss of a Star Destroyer. Monthma then wrote that the rebellion must start making aggressive moves or else it would be defeated. This was a moment the senator believed was inevitable, yet not one she was expecting to face so soon. At some point, rebel archivist Hendri Underholt compiled Tano's two messages and Mothma's journal entry in The Rebel Files, a compilation of information, reports, and accounts belonging to the Alliance, in the "Alliance Chron 1" section,[27] dated to between 5 BBY and 0 ABY.[30]
Later recollections[]
- "Sir, with all due respect, nobody has ever captured a Star Destroyer. And don't tell me it's because no one has ever tried. Yeah, way back in the day, we managed to take out a governor's destroyer over Mustafar, but since then, the Imperials have shored up their defenses against infiltrators. These days Star Destroyers are nearly invulnerable."
- ―Thane Kyrell, to Carlist Rieekan

Gold Two (left) believed the destruction of the Sovereign made things harder for the rebellion.
In 2 BBY,[32] the Spectres were tasked with refuelling the rebel Gold Squadron, who were escorting Mon Mothma into hiding following her treasonous remarks against the Emperor. One rebel pilot, Gold Two, remarked that she had heard a lot about Phoenix Squadron, such as them destroying the Sovereign, which Garazeb Orrelios confirmed responsibility for while laughing. The Gold Two then suggested that the Spectres think again before attempting a similar "stunt," as the Empire had tightened security across the Outer Rim as a result of the attack, making it more difficult for other rebels.[33]
Prior the Battle of Jakku in 5 ABY,[15] the New Republic, successor to the Rebel Alliance, intended to capture starships from the Empire, so assembled soldiers who had previously served on Imperial vessels. When informed of this plan by General Carlist Rieekan, pilot and former Imperial Thane Kyrell expressed unease, citing that although the Sovereign had been destroyed over Mustafar, the Empire had since increased its defenses against infiltrators and that nobody had ever captured a Star Destroyer. Although the New Republic ultimately won at Jakku, Kyrell's mission to capture the Inflictor failed, as the Star Destroyer's captain scuttled the ship rather than let it fall into enemy hands.[31]
Behind the scenes[]
Notable appearances[]
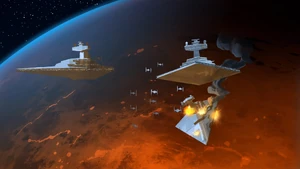
Concept art of the Sovereign's destruction
The Sovereign was first mentioned in Tarkin, a 2014 novel written by James Luceno.[12] The Star Destroyer then made its first appearance in "Call to Action,"[1] the thirteenth episode of the first season of the animated television series Star Wars Rebels. The episode first aired on February 9, 2015.[34] Although unnamed in "Call to Action,"[1] the Star Destroyer was identified as the Sovereign in the following episode, "Rebel Resolve,"[9] which aired on February 23 of the same year.[34]
Within Fantasy Flight Games' miniatures game Star Wars: Armada, a card of the Sovereign was included in the 2018 Chimaera Expansion Pack[35] and reprinted in the 2020 Upgrade Card Collection.[36] Artwork of the Star Destroyer, illustrated by Leos Ng,[37] was reused from the 2003 Star Wars Legends video game Star Wars Galaxies: An Empire Divided. In the game, the artwork is an in-universe painting titled Imperial Star Destroyer,[38] which depicts the Imperial-class Star Destroyer Devastator.[39]
Inconsistencies[]
When depicted in Star Wars Rebels[1][5] and its related media,[10] as well as Darth Vader (2017) 15, the Sovereign is shown[40] with what Star Wars: Rogue One: The Ultimate Visual Guide identifies as a tractor beam targeting array, consistent with[16] other[2] Imperial I-class Star Destroyers.[16] However, in the Chimaera Expansion Pack,[35] Upgrade Card Collection,[36] Star Wars: Galactic Atlas,[11] Darth Vader (2017) 14,[41] and Darth Vader (2017) 16, the Sovereign is depicted[42] with what Star Wars: Card Trader identifies as a communications tower.[43] This feature has been shown on Imperial II-class Star Destroyers.[44] The present article assumes the former sources are correct.
In the Star Wars Rebels episode "Fire Across the Galaxy,"[5] which aired on March 2, 2015,[34] several TIE fighters land in Bay 5 as the rebels' electromagnetic pulse detonates. However, when Tarkin's reinforcements arrive in the same hangar aboard two Sentinel-class landing craft, the bay is empty. Likewise, later in the episode when the rebels arrive in the bay, the TIEs have returned and the landing craft have disappeared.[5]
The Star Wars Rebels webcomic adaptation,[2] which began publication on December 6, 2019,[45] depicts Kanan Jarrus' interrogation,[2] as shown in "Rebel Resolve,"[9] to occur in the Imperial Complex.[2] However, in the episode itself, Ezra Bridger states that Jarrus was not being interrogated in the complex, with the Spectres learning at the end of the episode that he was imprisoned on the Sovereign.[1] Additionally, Amy Beth Christenson's concept art for Jarrus' cell was titled "Imperial Star Destroyer interrogation room."[46] This article assumes the webcomic to be incorrect and that the interrogation took place on the Sovereign.
Appearances[]
- Darth Vader (2017) 13
- Darth Vader (2017) 14
- Darth Vader (2017) 15
- Darth Vader (2017) 16
- Darth Vader (2017) 17
- Tarkin (First mentioned, simultaneous with audiobook)
- Tarkin audiobook (Mentioned only)
- Lost Stars (Indirect mention only)
- Lost Stars audiobook (Indirect mention only)
- Star Wars Rebels webcomic
 Star Wars Rebels — "Call to Action" (First appearance)
- Battle to the End
- "Call to Action" audio drama
 Star Wars Rebels — "Rebel Resolve"
- "Rebel Resolve" audio drama
 Star Wars Rebels — "Fire Across the Galaxy"
- "Fire Across the Galaxy" audio drama
- Star Wars Rebels: The Siege of Lothal (Indirect mention only)
- "The Siege of Lothal, Part 1" audio drama (Indirect mention only)
 Star Wars Rebels — "Secret Cargo" (Indirect mention only)


