R3-S1, nicknamed "Threece," was an R3-series astromech droid with feminine programming that served as part of the Alliance to Restore the Republic. By 1 BBY, she was recognized as chief of the astromech droid pool in the rebel headquarters on the moon Yavin 4, where she was responsible for the upkeep of the base's equipment rather than being assigned to a starfighter. R3-S1 was vain and argumentative, as well as inordinately proud of her overclocked Intellex V processor.
When the Alliance Fleet was scrambled to fight at the planet Scarif, R3-S1 flew with rebel pilot Barion Raner as Blue Four. Once in the Scarif system, they tried to pass through the planet's Shield Gate with the rest of Blue Squadron, but were not quick enough, forcing Raner to pull up before crashing. They then aided the Alliance Fleet above the planet, some of which ultimately escaped with the plans to the Death Star superweapon.
Biography[]
Stationed on Yavin[]
The R3-series astromech droid[1] designated R3-S1 and nicknamed "Threece" served the Alliance to Restore the Republic during the reign of the Galactic Empire. She was stationed at the headquarters of the Alliance's Massassi Group in the Great Temple on the moon Yavin 4. Instead of being assigned to a starfighter, she was employed in the upkeep of technology throughout the base,[2] making sure it was up to date and in prime condition. R3-S1 eventually became recognized as the chief of the astromech pool there.[3]

Jyn Erso and Cassian Andor passed R3-S1 on Yavin 4.
In 1 BBY,[5] R3-S1 was present in a hangar of the temple after Alliance High Command met to discuss attacking the Empire's forces on the planet Scarif in order to obtain plans to the Death Star superweapon. The meeting ended with a decision not to launch an attack, but the recently recruited rebel Jyn Erso assembled a group of rebels willing to follow her to Scarif against the orders of Alliance Command. Erso and Captain Cassian Andor led the group through the hangar and past R3-S1 before boarding the stolen[4] Zeta-class Heavy Cargo Shuttle SW-0608[2] and taking off to start the Battle of Scarif.[4]
Battle of Scarif[]
- "Pull up!"
[Grek screams] - ―Barion Raner tries to save Vangos Grek
When the Alliance Fleet was later scrambled from Yavin to aid the rebels on Scarif, R3-S1 was loaded into the astromech socket of the T-65B X-wing starfighter flown by[4] Barion Raner, a pilot flying with Blue Squadron as Blue Four.[2] Upon arriving in the Scarif system, Admiral Raddus directed Blue Squadron to provided cover for the rebel ground forces. In order to reach the surface, all of Blue Squadron raced to pass through the Shield Gate in the planetary shield around Scarif, but after Blue Leader Antoc Merrick made it through the gate began to close. Realizing that he did not have time to make it through the closing gate, Raner pulled up in time to prevent him and R3-S1 crashing into the gate and perishing, as[4] Vangos Grek[2] and another pilot did.[4]

R3-S1 flew with Barion Raner at Scarif.
Raner and R3-S1 then joined the other members of Blue Squadron who had not made it through the gate in aiding the Alliance Fleet above Scarif. While chased by three TIE/ln space superiority starfighters, the pair managed to destroy one of the Imperial I-class Star Destroyer[4] Persecutor's[6] deflector shield generator domes, which allowed the Star Destroyer to later be disabled by Gold Squadron's ion bombs and used to destroy the Shield Gate. With the gate gone, the Death Star plans were then successfully transmitted from the surface and a portion of the fleet,[4] including some of Blue Squadron, managed to escape from the Scarif system. However, Blue and Red Squadrons had lost nineteen pilots and crew during Scarif and an earlier mission to the planet Eadu and so few pilots were left that the Alliance was unsure if it could even field Blue Squadron when the Death Star attacked Yavin not long after.[7]
Characteristics[]
R3-S1 had feminine programming and a black sensor. She was built with silver plating, apart from her plastex cranial dome, which was transparent with orange markings. The astromech was equipped with an overclocked Intellex V processor and a holoprojector built into her dome.[2]
R3-S1 excelled at organization, which earned her recognition as head of the astromech pool. At some point she picked up a vain programming flutter that resulted in her not working well with others and being competitive to a fault.[2] The droid was also argumentative and inordinately proud of her overclocked processor. Despite this, she was highly valued by the Alliance. R3-S1 stood 1.09 meters tall and,[3] like all R-series astromechs, was manufactured by Industrial Automaton.[1]
Behind the scenes[]
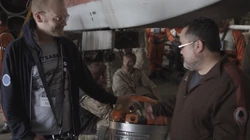
- "This is currently R3-BHD. Normally, he'd be R2-BHD with a silver dome, but today we sorted out for the clear dome. So he's an R3."
- ―Brad Oakley

Brad Oakley (left) built R3-S1.
R3-S1 was created for the 2016 Anthology film, Rogue One: A Star Wars Story.[4] She first received a designation simultaneously in the reference books Star Wars: Rogue One: The Ultimate Visual Guide by Pablo Hidalgo,[2] Star Wars: Rogue One: Secret Mission by Jason Fry,[9] and Star Wars: Rogue One: Ultimate Sticker Encyclopedia by Emma Grange and Shari Last,[10] which were all released alongside the film.[11]
R3-S1 was made by R2 Builder Brad Oakley and used the same body and limbs as the astromech R2-BHD, with the R2 unit's silver dome being swapped out for R3-S1's transparent one. Because of this, R3-S1 was known as R3-BHD on set. Prior to the shooting of the hangar scene where R3-S1 appears, a dry run for the droid's movements were carried out and a route that would not get in anyone's way was planned.[8]
Appearances[]
- Rogue One: A Star Wars Story (First appearance)
- Star Wars: Rogue One: Secret Mission (First identified as R3-S1, simultaneous with Star Wars: Rogue One: The Ultimate Visual Guide and Star Wars: Rogue One: Ultimate Sticker Encyclopedia)
Sources[]
- Star Wars: Rogue One: The Ultimate Visual Guide (First identified as Threece)
- Star Wars: Rogue One: Ultimate Sticker Encyclopedia
 LEGO Star Wars Rogue One (Set: 75172 Y-Wing Starfighter) (as Rebel Astromech Droid)
The Star Wars Show: Star Wars Rebels Coming to Celebration Orlando and the Best Star Wars Video Games with Xavier Woods on the official Star Wars YouTube channel (backup link) (Posted on StarWars.com) (as R3-BHD)
- Star Wars: Geektionary: The Galaxy from A - Z
 Star Wars: Build Your Own R2-D2 79 (Droid Directory: Droids of Yavin 4)
- Star Wars: The Complete Visual Dictionary, New Edition
- Star Wars Day-at-a-Time Calendar 2020
 Every Droid in Star Wars | Star Wars By the Numbers on the official Star Wars Kids YouTube channel (content now obsolete; backup link)
- Star Wars Day-at-a-Time Calendar 2021
- Star Wars Day-at-a-Time Calendar 2023
- Star Wars Day-at-a-Time Calendar 2024
 "Hal Hickel: 'Well, Watto Ya' Know?'" — Star Wars Insider 225 (Picture only)
 R3-S1 in the Databank (backup link)
Notes and references[]
- ↑ 1.0 1.1 1.2 1.3 1.4 Since the designation R3-S1, as given in Star Wars: Rogue One: The Ultimate Visual Guide, uses the R3 prefix, this article assumes the droid to be an R3-series astromech droid. Star Wars: The Visual Encyclopedia further states that all astromech droids are second class droids and establishes that R3-series astromech droids are part of the R-series, which Star Wars: R2-D2 Deluxe Book and Model Set states is produced by Industrial Automaton.
- ↑ 2.0 2.1 2.2 2.3 2.4 2.5 2.6 2.7 2.8 2.9 Star Wars: Rogue One: The Ultimate Visual Guide
- ↑ 3.0 3.1 3.2
 R3-S1 in the Databank (backup link)
- ↑ 4.00 4.01 4.02 4.03 4.04 4.05 4.06 4.07 4.08 4.09 4.10 4.11 4.12 Rogue One: A Star Wars Story
- ↑ Star Wars: Timelines dates the events of Rogue One: A Star Wars Story to 1 BBY.
- ↑ Star Wars: Geektionary: The Galaxy from A - Z
- ↑ "Duty Roster" — From a Certain Point of View
- ↑ 8.0 8.1
The Star Wars Show: Star Wars Rebels Coming to Celebration Orlando and the Best Star Wars Video Games with Xavier Woods on the official Star Wars YouTube channel (backup link) (Posted on StarWars.com)
- ↑ Star Wars: Rogue One: Secret Mission
- ↑ Star Wars: Rogue One: Ultimate Sticker Encyclopedia
- ↑
 NYCC 2016: Rogue One and Star Wars 40th Anniversary Publishing Programs Revealed on StarWars.com (backup link)
